Tuesday, February 28, 2012

How to Use Iron On Transfers as Masks for Painting & Stamping

I always love finding ways to take materials that normally look sort of clunky on a quilt and make them fit in much more smoothly.  A good example of this is iron-on transfer paper, which is great for its quickness and how easy it is to apply, but usually just ends up looking like you've got a big old piece of plastic fused onto the surface of your quilt.  I knew there had to be ways to liven up iron-ons and make them fit into a quilt seamlessly, and so I came up with several cool methods. 

The first technique I'll share is the idea of temporarily leaving the paper backing on the image once you've attached it to the fabric so you can use it as a mask to apply paint or marker around the image.  This technique is fun and easy!

Materials:
  • Inkjet iron-on transfer paper.  For this project, use the transparent kind so the texture or pattern on the fabric will show through your image.  
  • acrylic paints 
  • permanent markers such as Prismacolors.  
  • Light to medium colored fabric that will allow your transferred image to be visible.   
 note: because you cannot apply more heat after fusing the transfers onto the fabric, it is best to use pants and markers which do not have to be heat set, and to reserve this technique for projects that won't have to be washed, like quilts intended as wall art. 
Here's what you do:

1. Print out a sheet of images on iron-on transfer paper.  Fill up the page as much as you can, and make sure to mirror-image your design before printing if the direction matters.
transfer1
I never have trouble finding images to fill my sheets!

2. Cut out your images with scissors or a craft knife.  The closer you cut to the design the better this technique will work.  Ideally you want no white space around the edges.

transfer2
Three rubber chickens cut as close as possible, ready to be fused to fabric.

3. Iron your transfer paper onto the fabric according to the directions.  Make sure to leave the paper backing securely attached at this stage.
transfer3
Transferring the images to a white fabric with a pretty design woven into it.
transfer4
A closeup of the chickens waiting to have paint added.

4. Paint, stamp, block print, screen print, airbrush or draw with markers all over and around your images.
transfer5
From left to right: permanent marker, acrylic paint applied with a brush and then with a hand-carved stamp.

5. Allow your paint to dry, then peel off the paper backing.  The image should now stand out nicely against the fabric and at the same time feel more integrated into your project than if you had used iron on transfers by themselves.

The chickens with paint and marker perfectly placed around them.
The colors I used for this tutorial are extremely bold and badly matched, and I picked them because they stand out nicely, but it is very easy to achieve much more subtle and attractive effects.

transfer7
This quilt is the background for my blog. I carefully cut shapes from transfer paper and fused them onto a surface of inkjet printed fabric with embroidery, then applied paint using alphabet stamps to create an intricate texture.
quilt-follow-the-dragon3
A drawing printed onto iron-on transfer paper, with hand-carved stamped images applied around the figure.

Tuesday, February 21, 2012

How to Make Your Own Foam Pin Anchors for Quilt Basting

I recently became aware of a product that is designed to make it safe and easy for a person to use straight pins for basting a quilt instead of thread or safety pins.  This method saves time over basting with a needle and thread, and foam-capped pins are far easier to remove as you go than safety pins, which can be a bit fiddly to unclasp.
pin-anchors
Quilt in progress, pin-basted using my home-made anchors
 These little guys are super useful, and I realized that I had the tools and materials already available in my apartment to create my own version for almost no money.  Plus, as an added bonus, this may be the easiest tutorial I ever share! If you do not have the materials to make your own foam anchors, you can purchase them quite easily here

Materials:
  • dense foam about 1/2" thick (I use the edge-remnant pieces from a set of interlocking foam floor tiles, but there are tons of sources of dense foam in the world!) 
  • scissors
foam-pin-capper1
Foam floor tiles that came with extra bits on the sides
Here's what you do:

foam-pin-capper2
This foam cuts easily with scissors.  Simply snip into bits about 1/4" square, or whatever size you want!
foam-pin-capper3
A small amount of foam will make A LOT of little perfect sized pieces
As you pin your quilt layers together, simply slide a piece of foam onto the end of each pin.  The foam grabs the pin nicely and will stay on there until you remove it as long as your quilt doesn't get too much rough handling.  This method may work best for small to medium sized quilts.
foam-pin-capper5
As you quilt, simply pull the foam piece and pin apart and toss into containers.  Much easier than undoing a safety pin!
And that's all there is to it!

Tuesday, February 14, 2012

"Meet the Supplies" #1: SCISSORS!

I am an artist living in a New York apartment, and I own A LOT of art supplies.  I've had to choose art supplies over a lot of other things a normal person might own, such as nice clothing or any decent number of books.  Given how important they are to me, and the percentage of the available space in our place that is filled with them, I thought my giant collection of supplies might deserve a series of posts profiling what makes them great, where I got them, and why I keep them around.  First up, one of the most important tools any artist or craftsperson could ever own, SCISSORS.  

I once saw a comedian on TV who had a bit about how to survive being married to a crafter.  I don't remember most of the jokes, but I definitely recall that his Rule #1 was "Never touch her scissors." Seems to me this was not a bad piece of advice!

Normal scissors live in a giant mug. Gimmicky fancy-edge scissors live with my collection of decorative punches - those will get their own post sometime soon!
I have a bit of what one might call a "scissors problem." I really hate to part with a pair once it's in my life:
scissor-collection2
The (nearly) whole collection.  These are the scissors that stay at home with me.

scissor-collection4
And here are the ones that help me out at work, where they have the glamorous job of being used to make costumes for Broadway shows. 

I'm not even totally sure where I got some of these scissors, I've had them for so long!

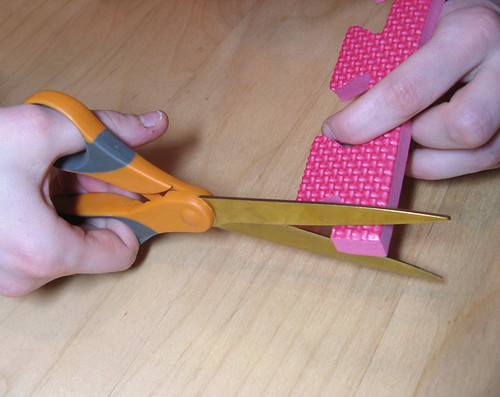
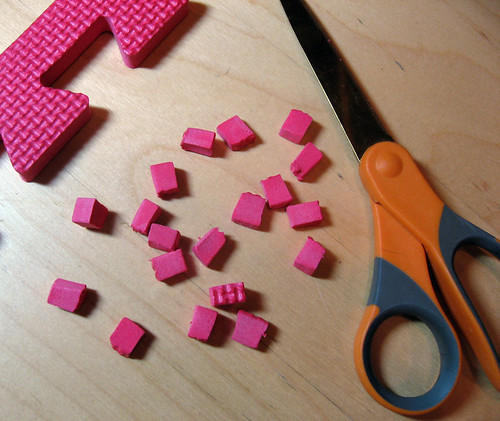
The three little silly decorative paper edgers are surprisingly useful, and I hope to feature some of the fun things a quilter can do with them in a future post, even though, very disappointingly, they are completely and totally unable to cut fabric. 

The pair of Fiskars with my name on them I've had for so long and abused so badly (in high school they suffered through years of being forced to cut through Formica tile samples!) that now they're basically reduced to cutting wire and things that get them all gross and gummy.  But I still love them!

The totally weird looking ones on the left side of the work-scissors photo are used to trim away fabric edges when doing machine applique.  On the bottom right are my pinking shears.

The three pairs on the bottom are really the stars of my collection.

scissor-collection3
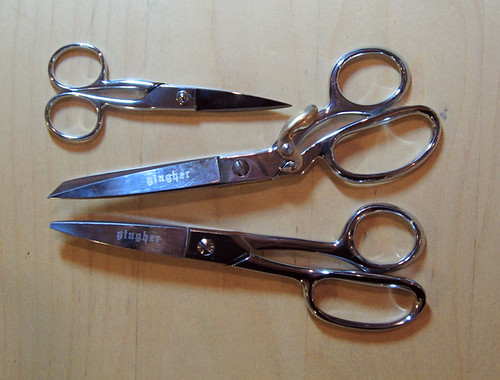
Three of my beautiful, solid Ginghers.
I suggest to anyone who has a little extra cash and wants to own a pair of scissors that will bring you joy, grab some Ginghers.
The pair on the top are pointed, knife-edged, and perfect for making small, intricate and clean cuts in either paper or fabric.
The middle pair are spring-loaded in order to reduce stress on the hands while cutting, plus they come with a fabulous steampunk style metal closure to keep them from attacking folks.
The bottom pair are specifically designed to give you extra leverage, so you can cut through tons of heavy layers super easily.  They may be the most fun to use scissors that I own, and they really shine when I use them to cut away all the excess layers of fabric, batting and laminate from the edge of a quilt after I've machined on the binding.

I have friends who laugh at the vastness of my scissors collection, and they're probably totally right, but I just laugh at them right back for owning only a single pair that aren't even sharp!