Showing posts with label dye. Show all posts

Sunday, March 17, 2013

Artist Interview with Kit Vincent, Part 1

It is time once again for an Artist Interview, with another art quilter I have recently discovered, and whose work I adore, Kit Vincent.  I am particularly thrilled to be able to share views of Vincent's studio and the process she follows when creating her work, which are two things I am always curious about when I encounter new artists. Kit gave excellent answers for a TON of my questions, so I'm going to break up her interview into two separate parts - look for part two next week!

 
Describe Your Workspace - is it in your living space or separate?
I have an 800 square foot studio located on the ground floor of our home. It faces Southeast with a view of the St Lawrence shipping lanes.  Distracting? Not at all!
The room is equipped with three 8'x 8' design walls, a large cutting surface and an even larger sewing table (made from a repurposed government desk) that measures 4' x 8'. This table houses two sewing machines, a Janome for piecing and a Bernina for embroidery. The table is large enough to allow large textile pieces to puddle freely on the surface, as I free-motion stitch. Without this surface, my larger works would drag on the floor. 

Studio view during the Open Studio Tour sponsored by the Thousand Island Arts Group

I have also repurposed our laundry room into a surface design lab. This room is equipped with a separate exhaust system from the rest of the house and so functions beautifully, when I want to dye, paint, stamp, discharge and otherwise distress many bolts of silk and pimatex fabric.

Dye run showing pimatex cotton ready for second application of colour

During the summer months I also have access to an old dockside summer cottage. It is now my 'summer art shack'. It has electricity and running water (albeit from a hose). I can really make a mess in this wonderful space on very hot days that are ideal for surface design work.


Re-purposed dockside cottage showing print table


Do you have a preference for working in your living space or elsewhere? 
I work and have work in just about every room in the house. 
is there anything your setup doesn't allow or that you have to do in a weird way?
I wish I had planned for more storage space.

Have you come up with any ridiculously clever ways of working with the space you have available to you?
I have a 200 foot garden hose that I throw  over our cliff to reach down some 30 feet to my Summer Art Shack. This brings running water  to this area where I carry out most of my surface design activities  - I have even run an occasional workshop this way.  I also rigged up a French Drain next to the Shack.  Having running water makes all the difference when working down there.  It’s rudimentary but it works! 
Flat dyeing workshop that I ran last summer for SAQA Central members

Would you say your personal style runs more towards clutter or organization? Does your style work for you, or are there elements of it you wish you could change?
Clutter always accumulates as I am working.  Once a project is finished though, I like to clean up.  I find that a clean workspace is so much more inviting when launching into something new - it can even act as a creative prompt.

Cutting table and ironing station with new project underway
 
Do you ever have to choose between doing some aspect of your work "the lazy way" versus "the better but far more annoying way," and has going for "the lazy way" ever produced unexpectedly awesome results?
In the past I looked for any and all silver bullets – I have since discovered that there are none.  I have learned the benefits of working with intent and I work only that way now. 
That said, I am still a sap for new gadgets and technologies:-))

First Light, 42x60", 2010,  Hand-dyed cottons and silks, machine pieced and quilted

Are there any particular patterns or motifs that creep into your work when you're not paying attention (as opposed to the motifs you've consciously chosen to work with), and have you given any thought to where they might come from? 
I came to stitched art roughly ten years ago. My early work represents numerous explorations into all types of imagery and media. Some of this work has been representative, namely my embroidery and surface design work. I also experimented with fabric collage that eventually brought me closer to abstract design. Currently I work with abstract imagery, focusing on my own designs.
Refuge, 28x28", 2006, hand-dyed cottons and silks, wool felt, fabric collage, machine quilted.  An example of earlier work.

Do you incorporate any materials or techniques into your art that are not normally thought of as art supplies?
I have been experimenting and working with hand-coloured fabric paper, made with a polyester substrate, also known commercially as ‘bounce’.  I can get this stuff by the 72” roll before it is thrown into a nearby land-fill by the manufacturer.    
Painted sheets of polyester substrate drying in my laundry room
What about these items makes them appeal to you personally? 
This material can be made into a very strong fabric-paper.  It can be cut, does not ravel, takes fabric paint beautifully and can be sewn or fused at will. In many respects way better than paper and a lot easier to collage than fabric
How do you use them, and how did you discover this unexpected artistic use?
My friend Jennifer Hodge who owns a quilt shop in Brockville Ontario (www.picketfencefabrics.com) discovered this material.  She uses it to make patterns. 
She suggested that I play with it to see if anything else could be done with it.  I have been working with it ever since.
Are there any media or methods that you know are definitely NOT FOR YOU?
Working with a pattern.
Are you a stickler about your particular medium, or are you happy to cheat, borrow and steal from other disciplines whenever it seems like a good idea?
I have never hesitated to beg, borrow and steal (ethically, of course) any and all good ideas.

Fused collage design includes polyester substrate and is inspired by some of Sue Benner's earlier pieces (www.suebenner.com)

Which materials do you tend to amass at a far greater rate than you could ever hope to use them in your work?
Pimatex cotton, I buy it 100+ yards at a time.  I love to dye my own fabric and I have a healthy stash in my studio. 
I keep my hand dyes in sight on shelves.  It would be better to store them away from studio lights but then I forget I have them - I need to see them as I work.  I like to stack them by colour, then value.

What was your most recent art-material impulse, and what have you done with it or are you planning to do?
I am attempting to get a better handle on using Photoshop as an aid when designing.  I usually have more design ideas than I know what to do with and I hope that PS will help me explore each design in greater depth, also keep all these designs organized.  I recently came across www.lynda.com as a learning tool, which I love! 


Stay tuned next week for the second half of the interview, featuring more gorgeous images of Kit's work and process, plus tons of insights about artistic inspiration and making connections with other artists! 


Sunday, September 16, 2012

Art Show: "Line and Color," by Lisa Call at The ArtQuilt Gallery

Once again there is a new show at my favorite venue, The ArtQuilt Gallery in Chelsea, and this time I actually got to go and see the artist speak about her work.  The show, titled "Line & Color," will be on view through October 20th, 2012 and features works by Lisa Call, whom I had not previously known a lot about, but I am now a huge fan.

Lisa Call's gallery talk was filled with witty and informative thoughts on all kinds of topics - I'll include a few of my favorite bits from the notes I took, and hopefully my paraphrasing of her words will not be too inaccurate. As always, please forgive the inconsistency in the photos (for a better idea of what Lisa Call's work looks like, go check it out in person!)

Lisa Call Structures 115 at The ArtQuilt Gallery
"Structures #115"by Lisa Call
One of my favorite things from Lisa Call's talk was her description of her ongoing lack of relationship with what is trendy.  As an artist, she is concerned primarily with beauty and compositional integrity, and with achieving a sort of visual rightness, which is a thing that artists are uniquely inclined to seek out.  This concern for formal design qualities, along with the fact that Lisa Call does not incorporate any fancy cutting edge technology into her work, has meant that she is not walking a path towards trendiness.  This is, I think, true for a fair number of quilt artists, and the thing I took away from Call's talk is that if you approach your work with enough drive and take it seriously enough, you can build a solid career even in the midst of an art world that is not often concerned with the things you care about. 

Lisa Call Structures 72 & 32 at The ArtQuilt Gallery
"Structures #72" and "Structures #32"by Lisa Call
Call's total lack of interest in bringing technology into her work is particularly amusing in light of her job as a software engineer.  She's been a part of the computer world for basically forever, and finds that it holds zero interest for her - there is nothing she has to say through her work that cannot be brought about through a series of dyebaths, a twenty year old Pfaff and a massive investment of time. I think nearly all art quilters can appreciate this deliberate decision to embrace slowness in art.  Call says the success of her work may indicate that the world is ready to move towards tactile media again as part of a desire to bring beauty back into the world we inhabit.

Lisa Call Structures 38 & 143 at The ArtQuilt Gallery
"Structures # 38" and "Structures #143" by Lisa Call

The process Lisa Call uses to construct her quilts is extremely deliberate, and each step, from designing the work on the wall to cutting, piecing and quilting, involves no shortcuts.  As she says, no strip-piecing is involved - if a line is present in a certain spot it is because she specifically meant for it to be there.  I have a lot of respect for this way of working, and I enjoy how different it is from my own approach which favors reacting to a work as it develops in real time over careful planning.  One area where Lisa Call and I have a similar style, however, is dyeing!  Her way of dyeing is in direct contrast to her approach to construction - she uses no formulas, dyes only one yard of fabric at a time, and embraces the "you get what you get" quality that is the result.  Brilliant!

Lisa Call Dream 37 & 38 & Structures 97 at The ArtQuilt Gallery
"Dream "37," "Dream #38," and "Structures #97" by Lisa Call

Two final thoughts from Lisa Call.  The first is her answer to the inevitable question of where the distinction is drawn between functional quilting and Art Quilting.  Her response to this is simple and struck me as incredibly true.  The answer is Intention.  She creates her pieces with the idea that they are art.  That is their purpose, and it is definitely enough. 
The second thing is Call's suggestion of an artist that people interested in her work should also check out.  I think this is something I should bring into my posts on artists whenever it's possible - we can learn vast amounts from asking artists we admire who they go to for inspiration.  Her suggestion of an artist to check out is the painter Richard Diebenkorn, whose work is also carefully planned and meticulous.  

That's it - go check out the show!

Thursday, September 6, 2012

Informative Video on Low Water Immersion Dyeing

I have been doing a fair amount of fiber reactive dyeing recently, and today while trolling YouTube for random video tutorials on the subject, I came across one that quite nicely answers a question I didn't even know I had been meaning to ask.  The question, which I realized I had actually been wondering about ever since I started researching low-water immersion dyeing, is: When, exactly, should you add the soda ash fixative to the dye bath, and what will be the result of adding it at various specific points? 

It turns out someone else was also wondering about this - Glenda Hopp of http://SoManyColors.net has put together a video in which she explores the effects that can be achieved by adding your soda ash in various ways.  I like her no-nonsense approach to dyeing and also to making videos! 


Tuesday, May 15, 2012

My Donation for the 2012 SAQA Benefit Auction

"The Art of Inclusion #1"

Title: "The Art of Inclusion #1"
Materials: commercial cottons and sheer fabrics, hand-dyed cotton, inkjet printed cotton, wood, fabric pen, embroidery floss, beads, acrylic paint, polymer clay, laminated images and text, postage stamp, 6B pencil, metal eyelets, piece of a gold-leafed book cover, plastic parts, Shrinky Dinks
Dimensions: 12" by 12"
Date: 2012

This year, as part of my progress towards actually trying to sell my work, I joined the Studio Art Quilt Associates, which, for anyone not familiar with it, is a large professional organization for art quilters.  I was thrilled to see that I had joined literally just in time to make a quilt for inclusion in their annual Benefit Auction. The rules for this auction are simple: Make one original 12" square art quilt, and get it to the auction folks by the first of June 2012.  I immediately swung into action! 

quilt-art-of-inclusion001.4
Detail showing hand embroidery, free motion quilting, Shrinky Dinks (!), and pieces from pinball-style party favor games I had picked up years ago at a dollar store

For my very first donation to the SAQA auction, I decided to jump in and make the debut quilt in a series I have been thinking about for a while. The quilts in this series will actually all share the title of my blog, because they will hopefully be the best possible expression of my dedication to the Art of Inclusion.  The goal is to make a very large series of quilts, sized either 12" or 15" square, that will be created purely to provide homes for the zillions of little details and bits and pieces I am always creating.

quilt-art-of-inclusion001.3
In the bottom left corner, a my drawing of a numbat, inkjet printed onto fabric, plus a laminated postage stamp

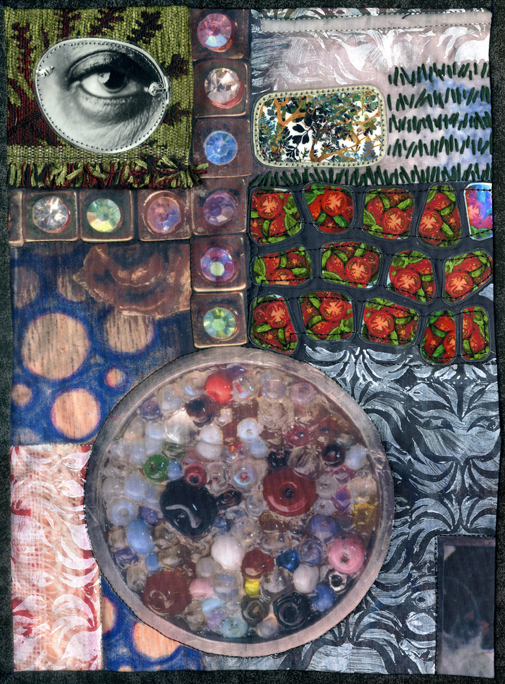
In addition to my main goal of Include-All-The-Things, this series will have two other interesting elements.  First, my approach to the design of these quilts will not be based on a landscape or portrait based way of working with my available space, but instead on the concept of filling in the space with existing elements as I go along, and creating small custom pieces to fill in gaps.  This is probably the way I work best, and has always produced beautiful results. A great example of the fill-it-in approach is this quilt from 2008.

"Filling Spaces: Eye, Tomatoes, Patterns"

The second idea behind the "Art of Inclusion" series is that these quilts, because they are square, will be able to work either separately or together as "blocks" in a larger wall installation.  I have always worked small, and that is not likely to change, but most quilt shows would prefer larger work, and I do like the idea of my quilts being able to command a room.

quilt-art-of-inclusion001.2
A photograph of some kelp from an old science textbook, glued onto plywood and cut out on my scroll saw, plus laminated random lines of text and a monster

I've included a number of juicy details in this first Art of Inclusion quilt, and many of them have been with me, waiting patiently, for years! There's the painted polymer clay monster mask with the broken ear, the free motion quilting sample of leaves stitched onto a scrap of plaid shirt, the laminated postage stamp, the traced Shrinky Dink leaves from the book of Khmer Ornament, and the drawing of a numbat inkjet printed onto fabric.  There's the scan of a marble I found on the street, the chunks of an unfinished cross stitch project my mother donated to my efforts, the random laminated lines of text from long-forgotten books, and the plastic covers from dollar store party favor games that used to be filled with ball bearings and now contain piles of beads.... And that's not even a fraction of my stash!

Sunday, April 1, 2012

The Free Motion Quilting Project: Studio E Challenge

The Free Motion Quilting Project: Studio E Challenge 

I had to put up a link to this post over on Leah Day's blog - I've been meaning to do some dyeing so I'll have more custom colors to use in my work, and this post is ridiculously inspiring! 

Here's the photo of her gorgeous result - click the link above for a very well written tutorial showing how she accomplished this beauty...

Leah Day's in-progress Studio E challenge quilt (photo via freemotionquilting.blogspot.com)