Tuesday, March 27, 2012

New Quilt: "Unconnected & Incomplete Topographies #1"

I have been making a series of quilts over the past few months that I think illustrates very nicely the philosophy I try to employ when making art. "Art of Inclusion" is all about never parting with anything I create because, some day, it will find the perfect home. A lot of what I have been producing lately are free-motion stitching samples, now that I finally have a machine that is built to excel at that. The samples frequently piss me off greatly when I make them because each one is a reminder that I cannot yet follow a line accurately or create perfectly even free-motion stitches or create decent right-angle turns, and I am frequently tempted to toss my stitch samples in the trash. But that is not how I work and so, I have been putting a lot of thought into how to jazz-up my samples so they magically look good enough to include in finished quilts.

This quilt began with a sample piece that included free-motion stitching in red, plus some swirls of yarn that represent my first ever attempt to use my Bernina #43 Free-Motion Couching Foot, which I will be reviewing here on the blog when I have mastered how to use it.  I embellished the muslin with random shapes of heat transfer foil, then hacked it into three pieces and rearranged them into vertical stripes. I covered the edges of the stripes with grey ribbon that was once the hanger-loops from a friend's skirt. The rest of the quilt was basically built around that central element, with the help of fabrics and unfinished bits some of which have been hidden in my stash for years. 
Unconnected & Incomplete Topographies #1
"Unconnected & Incomplete Topographies #1"
Title: Unconnected & Incomplete Topographies #1
Materials: muslin, various cotton & synthetic fabrics, inkjet printed cotton, yarn, beads, swarovski crystals, oil paint stick, heat transfer foil, sequins, lace, embroidery floss
Dimensions: 11.5" by 14.5"
Date: 2012

Click on details below to view larger versions on Flickr. 
quilt-incomplete-topography2quilt-incomplete-topography3

Thursday, March 22, 2012

How I Sign My Quilts

For some time now, I have been looking for a method of signing my quilts that is easy, quick to do, attractive, and reflective of my personal style.  For a while I was inkjet printing labels on fabric that included my name, the title of the work and the date, but those labels felt unpleasantly sterile-looking and out of place.  They definitely did not fit my personal style, and I did not enjoy including the title permanently on each quilt - what if the title needs to change?  I thought about simply signing my name with a permanent fabric pen, but that would limit my choices for backing fabric and might be difficult to spot even if I choose pale-ish fabrics every time.

This week, I had a sudden brilliant idea: I should sign by hand on paper and add the year, then laminate the signature and attach it to the quilt with stitching.  It's quick, easy, looks beautiful and is exactly the sort of thing I would do - my laminator is basically a second boyfriend! - I just can't believe it took me this long to get there.  
quilt-signature5
Quilts with signatures attached
Here is how to create a laminated signature for an art quilt

Materials:
  • Colored papers (these should be paper-weight instead of card-weight because they will laminate more successfully if they are thinner). 
  • Something to sign your name with (I used dip-pens and bottles of ink for this round, but you could use Anything you like, really - pencils, ballpoint pens, colored pencils, even crayons!) 
  • 10-mil laminate & a laminator. 
  • A 1/16" hole punch (seriously, if you don't have one of these, get one.  You would not believe how much I use mine!)
  • A glue stick.
quilt-signature1
Bottles of ink & dip-pen with nib
 Pick your writing tools and start signing.  You should make plenty of signatures so that you can weed out the ones that look crappy.  With a last name like Belikiewicz, I fall prey to ugly signature syndrome more and more as I age and my handwriting gets worse. 
quilt-signature4
Many signatures in different colors on different papers.
Make sure to leave enough room between signatures that they can be cut out individually. After you've signed your name until your hand starts cramping, go through and select the most attractive ones. I cut mine out so that they have rounded ends.  This is extremely time-consuming but I think the rounded ends look considerably better on the back of a quilt and are also less likely to catch on something when being stored or moved around. 
quilt-signature3
Signatures ready to be laminated. I guess I have to make A LOT of quilts this year just to use these things up!
Laminate pouches have problems with static, and tiny paper bits are prone to moving around and getting all overlapped and not useable.  A tiny dab of glue on the back of the paper solves this problem completely.
quilt-signature2
The tiniest amount of glue will hold your paper in place until you can run it through the laminator.
Use small laminate pouches.  Trying to laminate small items in larger pouches will result in air bubbles being trapped around the edges of your paper, which is unattractive and weakens the bond between laminate and paper. I used business-card sized pouches for this demonstration. 
quilt-signature8
Signatures staying in place nicely.
Use your 1/16" hole punch to make a hole at either end of the paper.  It works far better if you punch holes before cutting out small items.
quilt-signature7
Punch holes before cutting out signatures.
Cut out signatures as close to the paper edge as you think looks attractive.  It takes a bit of time to create a pile of signatures, but now you have them ready and waiting to attach to your quilts as you finish them.
quilt-signature6
Finished!  Now to make many, many quilts!

Monday, March 19, 2012

Available Materials Lab: Coffee Sleeves as Rubbing Plates

The "Available Materials Lab" is the section of my blog all about tips and tricks for making fabulous things using materials you can acquire easily and cheaply, or may even already have in your home.

I noticed a while ago that those paper sleeves you get with a cup of coffee frequently seem to have really interesting textures embossed into the surface, presumably to make them better able to protect your hand from the heat.  Since I have recently been very excited about finding different materials to turn into rubbing plates that can be used with various media on fabric, I thought coffee sleeves might be a perfect example of something that can produce an attractive, generic looking background pattern. 

Materials:
  • Coffee sleeves from wherever you get your coffee - collect however many you need to make a nice sized rubbing plate. 
  • Some sort of substrate to glue the sleeves onto - I used a cardboard mailer I found in the recycle bin. 
  • Basic white glue. Hot glue or a glue stick might work as well if that's what you have on hand.
coffee-sleeve1
I have a giant pile of coffee sleeves from Dunkin Donuts lattes.  Fortunately, now that I'm laid off I'm consuming far less of those!
This is a ridiculously easy project!  Just spread some glue on the backs of your coffee sleeves:

coffee-sleeve2


And arrange them together on your backing material.  The pattern will probably not line up perfectly, and you will pick up the line between the sleeves when you do your rubbings, but that's part of what makes these found-object rubbings look so great! 
coffee-sleeve3
If corners start to lift up, slap a big coffee table book on the whole thing.

You'll be surprised how beautiful the rubbings you produce using coffee sleeves can be! 
A small sample rubbing using white oil paint stick on blue silk.
coffee-sleeve5
Gold and maroon paint sticks on fabric that already had a polka dot design - a little busy perhaps?
 

Tuesday, March 13, 2012

New Quilt - "Fictional Animal: Five-Legged Tambat #1"

I've been working hard lately on making new quilts, but haven't been getting them up on the web because mysterious camera problems are preventing me from taking good pictures of them.  I finally managed to get this shot, which does a pretty good job of showing the texture in this quilt, which you can of course purchase from me over on Etsy!
Fictional Animal: Five-Legged Tambat #1
"Fictional Animal: Five-Legged Tambat #1"
Title: Fictional Animal: Five-Legged Tambat #1
Materials: various natural-fiber fabrics, fabric paint, fabric pastel, decorative thread, colored pencil
Dimensions: 12" by 10"
Date: 2012

I chose the name "Tambat" for the animal in this quilt because I am in love with wombats and numbats and figured there should definitely be some sort of animal called a tambat. 
quilt-5-legged-tambat2
"Tambat" in green fabric pastel, with fabric paint block printed onto a mix of fabrics on the left and bottom edges
The tambat is drawn on a piece of a button down shirt I found at a thrift store, which has fine silver threads woven into it.  The background behind the tambat was painted using fabric paints thinned with an actual fabric paint thinner product, rather than just water.  I had read that this would produce better results than water alone, and I did find that the paint flowed beautifully on the fabric. 
quilt-5-legged-tambat3
Thinned fabric paint used for sky behind the animal.  The panel on the right hand side incorporates colored pencil on fabric combined with white fabric paint and embroidery.
I have a plan for a whole series of "fictional animal" quilts each featuring a different drawing of an impossible creature.

Friday, March 9, 2012

How to Organize Your Sewing Machine Accessories

I recently acquired a new Bernina, and with this machine came an organizational challenge I've never had to face with my little Pfaff Hobby 1030.  With my Pfaff, all the accessories and feet that came with it can fit into the slide-on accessory bin that slides onto the machine and doubles as a sewing surface.  Since I've only acquired one extra foot for that machine, the built in storage has always been perfectly adequate.

Whole different story with my Bernina 530!  Between the feet it came with, the ones I ordered when I purchased the machine, the various tools, needles and accessories, AND the feet I'm sure I'll keep impulse purchasing as time goes on, there was NO WAY the lame storage box that came with the machine would ever meet my needs.  Below is the box I ended up buying to hold all the stuff, after spending an extremely enjoyable hour and a half at the Container Store, trying to put sewing machine feet into every box in there while chatting with a nice young man who seemed to share my enthusiasm for changeable compartments.

bernina accessory organization1
My exciting new Bernina accessory storage solution
This is the accessory box that came with the machine.  Very attractive, but in the end the thing is not well designed AT ALL!
bernina accessory organization2
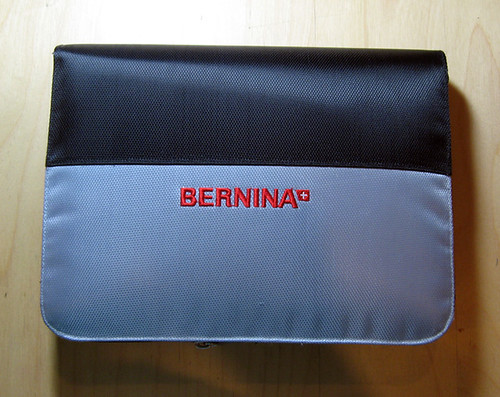
Very stylish, too bad it doesn't do its job!
Here are the problems with the Bernina accessory storage box:
  • It does not have enough little compartments to hold nearly the number of feet I'll eventually own! 
  • When you zip it closed and take it somewhere, the feet and other accessories get all mixed up together because the box is not capable of keeping each item in its place. 
  • The little foot-compartments are nearly all the same size, and one of the feet that came with the machine didn't even have a place it could fit comfortably.  The only foot that has a truly perfect little cubby of its own is the automatic buttonhole foot (as we'll see later in the post, that one actually gave me a bit of a challenge when creating the new system!) 
  • All the non-feet accessories just have to be piled together in one L-shaped compartment and it's annoying to dig through there looking for the one thing you need. 
  • As if all that weren't enough, the accessory box is flocked on the inside, and continually sheds fine black fibers onto everything inside it.  
bernina accessory organization3
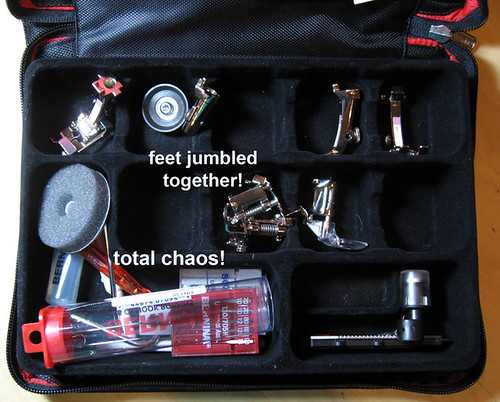
The accessory box's interior after being carried around in my bag.
Here's how beautiful everything looks now: 
bernina accessory organization5
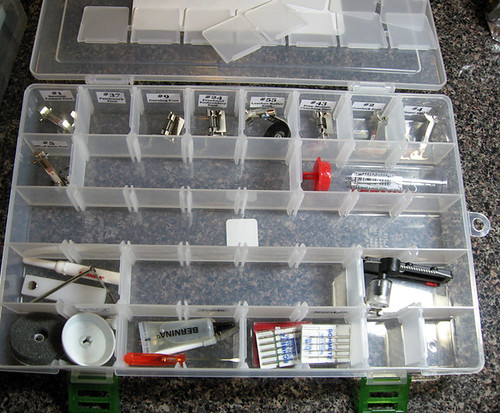
A perfectly sized place for everything, plus tons of room to grow!
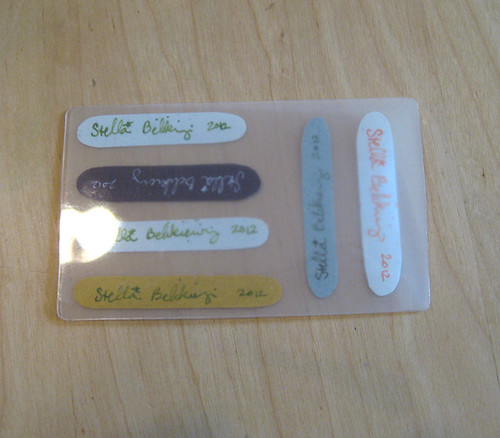
 I wanted each foot to be super easy to spot at a glance, so I printed individual labels from my computer and affixed them with packing tape.  My label maker is away from home at the moment, and plus these labels look extremely cute! 
bernina accessory organization6
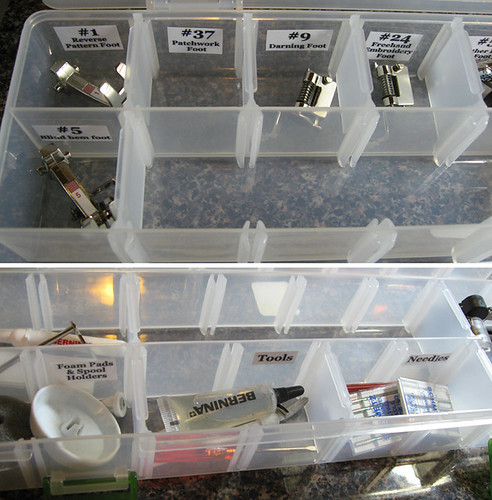
Everything neatly labeled and easy to find.
I decided bobbins didn't need to be factored into my container choice, since I already have a perfect way to store them: 
bernina accessory organization7
These rubber doughnut shaped rings are absolutely my favorite bobbin storage solution!
Everything about this plan was falling so perfectly into place, but there did end up being one small challenge.  The automatic buttonhole foot that came my machine, the one that fits so perfectly into the Bernina case, was just not quite able to go all the way into this new box.  Fortunately, the solution to this problem ended up being both fun and dramatic.
bernina accessory organization4
The automatic buttonhole foot does not quite fit into my box, so I'll just have to change the box!
I decided to melt a hole between two rows to make an appropriately shaped spot for the buttonhole foot.  I marked where I would need to cut the plastic with a sharpie, then cut into it using a wood burning tool. 
bernina accessory organization-melty
Melting the plastic with a wood burning tool.
It turns out that melting this kind of plastic with a wood burning tool is extremely easy, but does produce stinky, probably hazardous fumes, so if you do something similar, make sure there's good ventilation. 
bernina accessory organization-melty2
The automatic buttonhole foot in its new home.
My new marvel of organization makes me super happy, and is able to hold almost every foot I might buy, except for bulkier ones like the walking foot or the cutting attachment.  It does take up a bit more space than the old box, but the space is now used so much better!
bernina accessory organization8
Old container and larger new contaniner
Now that I have them all so delightfully organized, stay tuned in the future as I post detailed reviews of some of the more fun and strange Bernina feet I have acquired!

Tuesday, March 6, 2012

Product Review: Sewline Mechanical Fabric Pencil Lives Up to Its Reputation

I kept hearing that the Sewline Mechanical Fabric Pencil is the best tool ever for making beautifully readable, completely removable marks on dark colored fabrics, so I decided to pick one up and see for myself.  At around $16 per pencil, it's a bit of a pricey impulse purchase, but I hoped I would find it to be the perfect tool. The Sewline pencil comes in a few different colors, and I decided to go with basic white lead. 
The Sewline pencil has a nice rubbery grip and operates just like any mechanical pencil.
Essentially, what I found is that this product lives up to its hype!  
sewline2 
Lead is advanced by clicking on eraser.
The "lead is nice and fine, advances easily, and writes very cleanly as long as your fabric is fairly smooth.  The white stands out brightly on dark fabrics, though it can be a bit difficult to see on fabrics with prints that include light values.
sewline4
It is extremely easily to create straight lines, or to draw any shape you like.
One of the big questions with any fabric marking implement is, how easy is it to remove the marks once you no longer need them. The Sewline pencil does include a built in eraser, but I think I will probably not use it a whole lot because, while it does seem to work, it's extremely inefficient to use if you want to erase marks from any decent area of fabric. 
sewline3
Twist metal end to advance eraser. 
If the fabric is extremely smooth, I've found the pencil marks can be removed simply by rubbing with a paper towel or another piece of dry fabric, but for fabric with any texture to it, a damp cloth seems to be effective. 
sewline5
Lines after being erased with damp cloth
The lines appear very slightly after being scoured with a damp cloth, but I find that after a few days of additional handling, they disappear pretty completely.
 
Summary:
PROS: The Sewline does seem to be a solid, easy to use marking tool!  I love the clean, smooth, fine marks it makes which are both super visible and quite easy to remove.
CONS: The only issue I can see with this product is that the lead gets used up extremely quickly, so refills may need to be purchased often.